Friday, December 21, 2012

Chocolate Walnut Tangerine Biscotti

This recipe I made as one of five biscotti loafs for my coworkers as Christmas treat. I could not think of what other flavor to add to chocolate and then I remembered the chocolate orange candy that had to be smashed to break and chocolate slices. That's when it hit me that chocolate orange could work .
3 eggs
1 c sugar
1/2 stick of melted and cooled butter
1 tsp vanilla extract
1 tbl sp tangerine or orange juice
1 tsp baking soda
1tsp baking powder
2 tbl sp cocoa powder
orange zest from 4 tangerine or 2 oranges or approx 2 tbl sp
3 c sifted flour
1 1/2 walnuts
I use my Kitchen Aid to make the dough. Mix ingredients adding them one at a time in the same order they are written but start with only 2 cups of flour. Soft dough will form. If the dough is looking a little to tough reduce amount of flour or may add couple more spoons of orange juice, if the dough is little too soft add little more flour.
I turn the dough on the silicon mat and using the mat form it into a log.
Bake the log in the middle of the oven at 300F for approx 50 min. It may crack on the top and will widen as it bakes. Once out of the oven cool for 10-20 min or so, then slice on a bias 1/2 inch thick slices.
Place on the oven rack in the oven cut side down for another 15-20 min to dry. Cool cookies on wire rack.

Tuesday, November 6, 2012

Persimmon salad

This was a very simple salad that was born in my head as I looked out at my Fuyu persimmon tree from the kitchen window. I love to use what is available seasonally.
1/2 red onion sliced
1 rib of celery sliced
1/2 medium jicama julienned
1/2 red pepper sliced
1 firm Fuyu persimmon julienned
12-14 sprigs of cilantro chopped
Juice from half of the lime
2-3 tablespoons of olive oil
2 tablespoons of pomegranate (optional)
Salt-and-pepper to taste
In this recipe, molasses could be substituted for lime juice with result that will have much less punch to it and salad will be a lot sweeter. Start by slicing the onions and adding it to a bowl then putting salt and pepper over. I find it if the onion is salted it becomes less sharp, so that my kids can eat it. While the onion is "sweating" the rest of the ingredients sliced and added to the bowl. Lime and oil are added last. Mix well and serve.

Wednesday, October 17, 2012

Rice with Mung Beans and Butternut Squash

This is the season for pumpkins and other winter squash. I love that vegetable and use it frequently. It is so versatile  so much could be done with it from stews and soups, to deserts. This can be a starch on your dinner plate or just a dish by itself if you are vegetarian.
1 1/2 cup of Basmati rice
1/2 cup of split mung beans
1 Onion chopped
Half of butternut squash cut in chunks
1/3-1/2 cup of oil
1/4 teaspoon cumin
1/2 teaspoon garlic powder
1 teaspoon turmeric plus more for garnish
1 teaspoon Sumac
1 teaspoon paprika
1/2 -1 cup raisins or dried cranberries or mix of both (optional)
2 c Water
Salt-and-pepper to taste
Chop and sauté the onions till golden yellow, adding salt and spices. Add butternut squash and sauté for few more minutes. While onion and squash are cooking wash the rice several times by running it under cold water until the water runs clear. This could be done ahead of time and rice can also be soaked over night. To rice add mung beans and contents of the skillet. Stir and cover with water. Since I used rice cooker, the timer announced when the dish was done but it was no more then 25-30 min. Split mung beans and rice were done and butternut squash was tender since it was cut in relatively small size chunks and started cooking in the skillet. More sumac was added for garnish.

Tuesday, October 16, 2012

Feijoa Salsa

Well, you have tried all kinds of fruits in salsa, I'm sure. I love peach and mango salsa that is out there. I did not invent anything new by making this one. I just am using what I have in abundance now, and that is Feijoa. I've done other things with it, and this is just another dish with this fruit.
1 Onion diced
1 Garlic clove pressed
5-7 Plum tomatoes diced
5-7 Feijoa fruits diced
10 or more sprigs of cilantro chopped
1 or 1/2 jalapeno finely diced
1/4 tsp cumin
juice of 1 lime
salt and pepper to taste
Start with onion, and salt it. Let sit for few minutes. I find that this takes some bite out of onion and your bad breath later. Squeeze or grate on micro plane zester garlic clove into the onion, then squeeze lime juice over.
While onion and garlic marinating, chop the rest of the ingredients. Be careful with jalapeno and use gloves when chopping it. Capsaicin can make your life miserable if not properly removed from your skin, and if unwashed hands get on your mucous membranes, don't blame me. Depending on how hot you want your salsa, use jalapeno whole or half. Also, the seeds and veins in the pepper are the spiciest parts. Mix well and enjoy.


Sunday, April 8, 2012

Passover White Chocolate Apple Torte

This isn't exactly my recipe and at the same time it is. I stumbled upon a recipe similar to this one, several years ago on the Internet by searching for a Passover dessert that I could make. This year I could not find it on the net if my life depended on it. I only remembered some of the ingredients and the method of preparing it, so I decided to experiment. One of the ingredients, in fact, was missing in my pantry. From what I remember, the recipe called for chocolate bar that had to be grated. I did not find any chocolate that I can use in my house, so I decided to use what I had in the house, which was white chocolate chips. Ta-dah: an amazing tort was born, even if I have to declare so myself. The rest is fairly straightforward.
6 eggs
1/4 teaspoon of cream of tartar
1 cup of sugar
1/2 cup of matzo meal
1 cup of white chocolate chips
1 cup of walnuts
2 cups of grated Granny Smith apples or other tart apples
Cooking spray
Preheat oven to 375 degrees. Lightly coat an 8-inch spring form pan with nonstick spray. Separate the eggs. In a food processor shred the apples and set aside. Using pulse chop walnuts to pea size pieces and set aside. Repeat the same with white chocolate chips making them half their size smaller and set aside. Using food processor or an electric mixer and a large bowl, beat egg yolks and half of the sugar,  until thick and pale, about 3 minutes. Mix in matzo meal, then add in apples, white chocolate chips and walnuts. In another bowl, or Kitchen Aid  mixer with clean beaters, beat egg whites with cream of tartar and the rest of the sugar, until stiff peaks form, about 4 minutes. With a rubber spatula, gently fold egg whites into apple mixture, taking care not to deflate egg whites. Then, transfer batter to pan.  Bake until golden brown and set in center, 45 to 50 minutes. Let cake cool completely in pan on a wire rack. To serve, run a small knife around edge of pan, remove cake, and slice.

Saturday, March 31, 2012

Charlotte or Upside Down Apple Cake

I have not made this cake since I was a kid. In fact, I almost forgot that it exists. My mom reminded me about it when she visited me last winter. This cake is familiar to every Russian. It is so simple to make and it is so delicious I can't believe that I have not made it since I was 14. In Russia it is called Charlotte and I can call it that,  too,  or I can say it is an Upside Down Apple Cake. My mom makes it using the recipe a little bit of this and a little bit of that, so  I have measured everything out here. I made it yesterday since we were invited to a Shabbat dinner and I was requested to bring a parve dessert. Parve means that it's neither dairy or meat. I could not think of anything but Charlotte.
6 eggs separated
1 1/4 cup of sugar
1/4 teaspoon Cream of tartar
1 teaspoon vanilla extract
1 cup of flour
2 Granny Smith apples peeled and sliced
Cooking spray for spring the pan and flour for dusting it.
Prepare your apples first. Spray with cooking spray the baking pan and dust it with flour. Tap on the baking pan to remove excess flour. Separate egg yolks from egg whites. I use both my food processor and my KitchenAaid mixer for the next two steps. In the clean bowl with a whisk attachment whip up eggs whites with cream of tartar and half of the sugar, until egg whites form stiff peaks. In the food processor, mix egg yolks with the rest of the sugar until thick light yellow mixture and ribbons form when you lift the blades. Add vanilla and flour to the egg yolks and mix until well blended. The next step is important, because you must carefully fold egg yolk mixture with about about one third of whipped egg whites without deflating egg whites too much. Then carefully fold the rest of  the egg yolks and whites together. Once you have everything folded together you can fill in the cake mold pouring the cake batter over the arranged apple slices. Place in the pre-heated oven at 350 F and bake until the tooth pick inserted in the center comes out clean, or for about 50 minutes.
My mom used the same recipe when she made a birthday cake for me when I was a kid. She made it for my youngest when she visited this winter. Here are some pictures of the cake. To make it in to colors, before folding the yolks and egg whites she divided the egg yolk mixture in two, then to half of the mixture about a tablespoon of cocoa was added. This way she would have two batters one chocolate and one vanilla. The egg whites would also be divided in two and once folded together baked in separate baking pans. That way you would have to layers of the cake or four if you cut the individual cakes in two after baking. Another option is to pour the chocolate batter into the vanilla batter once it's in the baking pan, this creates a marble effect in the cake once it's baked. The icing for this cake was also quite simple. Soft and unsalted butter was whipped with sweetened condensed milk and once more adding a tablespoon of cocoa powder creates a chocolate flavor icing. Simple and very delicious just as the best childhood memory can be. "Mother knows best",-thanks for reminding me of that, Mom.

Monday, February 6, 2012

Potato Gratin with Yams

I have made this dish few times now and feel that it is time to share. In the past I have only done it with regular  potatoes but then I decided to mix it up a little. I like the look and the taste.
3 garlic cloves
2 tbsp butter
2 large baking potatoes
1 yam same size as regular potatoes
8 oz milk
1 egg
1 cup shredded cheese (Mexican blend or mozzarella - your choice)
1 red onion (optional)

Slice on the mandolin or by hand the yam and potatoes and onion if you wish to use it. spread butter on the bottom of the baking pan and add crushed garlic to the bottom. Layer the potatoes and yam alternately like the roof tiles. Even though the onion is not present in this picture, I have made it with red onion slices in the past and it makes a beautiful and delicious addition to the dish, just place the slices through out the dish. Mix milk and egg and pour it over the potatoes. Salt and pepper and place in the oven that has warmed up to 425 F. When the potatoes are fork tender, about 30-40 min, add the shredded cheese over them. If you like it cheesier add more, it does not hurt the dish at all. when the cheese is melted, in about 5 min the gratin is done.

Sunday, February 5, 2012

Baba Ganush

Back in March during Purim carnival I was in charge of Middle Eastern meal and Baba Ganush was apart of it. I was planning on making it from scratch, instead it turned into an adventure, where I had to search all stores for eggplant and ended up ordering it in bulk from Persian store. For some reason searching for eggplant left a mark on my mind, so when I walked in to my local oriental market and saw eggplants for 89 cents each, I had to buy a bunch and make something.
There are several spreads that are made from eggplants in Russia. As usually it is baked and pureed with something in addition to flavor it. Tahini was not very popular in may family and in fact not really known. When I was growing up usually garlic and mayonnaise or sour cream were added to flavor the cooked eggplant.

I learned to make Baba Gaush in the States and it is simple but takes time.
Eggplant is sliced in half and liberally salted, then allowed to rest to release the juice for up to 30 min. Then he juice is rinsed off and eggplant is roasted in the oven for about an hour at 375F. Once it is ready it is cleaned from skin before it is placed in food processor where it's pulsed and pureed with the rest of the ingredients.


3 medium eggplants
garlic about 5-6 cloves
parsley about 12 sprigs
1/2 c tahini
1/2 lemon juice
1/4 c olive oil
salt and pepper
This is a great spread with pita, or crackers and goes great on sandwiches.

Saturday, February 4, 2012

Two Vegetarian appetizers

These are simple and versatile vegetable dishes that can be easily used as side dish or an appetiser, as I did at a party. One is baked tomatoes and the other is grilled eggplant. These are really easy to make and go really well with goat cheese as well as on their own.
Several pounds of Roma tomatoes and cut in half and placed on the oiled baking sheet cut side up. You can clean and scoop the seeds out, but the seeds do not bother me, so I left them in. I sprinkled the tomatoes with salt and pepper and Herbs de Provence. Then I tried different ways of cooking these. I have done it the slow method for about 3 plus hours in the oven at 200F. They dry out very much like sun dried tomatoes. The other method is faster and leave the tomatoes little more juicier if you cook them at 350-375F for about 1 hour or even less. After they are cooked they could be placed in a container and covered with olive oil for storage in the refrigerator. You  will need 
  • Roma tomatoes
  • oil for baking sheet and for brushing eggplant
  • salt
  • pepper
  • Herbs de Provence
These do not really need to be packed in oil, it is just an option for you and the tomatoes are better if they are reheated in the oven the next day.
The other appetiser is not very complicated either. The eggplants are sliced length vise, brushed with olive oil and broiled for few minutes. Once the eggplants are done, they get filled with mixture of garlic and cilantro.
  • 2 large eggplants
  • bunch of cilantro
  • 1/4 c garlic cloves or less if that is too spicy for your taste
  • 1/4 c olive oil (Extra virgin if you want extra flavor)
  • additional oil for brushing the eggplants
  • salt and pepper
Slice eggplants and salt generously the slices. I do not peel the eggplants so the end product looks nice. Let the salt draw out the water from the eggplants for up to 30 min. While the eggplant sits with salt, in small food processor make eggplant filling -cilantro pesto by blending cilantro, garlic, salt pepper and oil. The filling should not be too liquid but well blended paste, so add oil just enough for the ingredients to chop well together. Rinse and blot dry the slices with paper towel. Arrange eggplants on the oiled baking sheet you can try a non stick spray on foil, works to. Brush the top of the eggplant sliced with oil. This vegetable will absorb almost as much of the oil as you will give it, so do not overdo it, oil here is more for the flavor then cooking. Broil about 2/3 up from the bottom of the oven and not immediately under the element. I then closely watch the eggplant as it broils, for It can easily burn and cooks really fast. If you feel the need you could flip it over, but I usually do not. When it looks slightly brown and wilted it is ready. Send the next bunch in. Depending on the size of the eggplant, 2-3 baking sheets will get the job done.  Once the first batch is done fill the eggplants with cilantro paste while they are still warm, so that the flavors merry well. Spread about 1 tsp over the eggplant slice and roll it on itself and arrange the rolls on the serving plate.
I was told that these go great with vodka shots. But I like them by itself and with small piece of cream cheese or goat cheese, just do not plan on kissing without mint gum later on. Other then that, enjoy!

Thursday, December 22, 2011

One Can Never Have Too Many Latkas

Since I love latkas and welcome the opportunity to make some I also try to come up with different varieties of latkas. These recipes have come out great.
3-4 large potatoes
3 eggs
1/4 c flour
2 tbsp of  subziash (Persian mix of dried parsley, leek and spinach)
1tsp slat and pepper
Potatoes are shredded on small shredding blade in a food processor and drained of excess liquid. I keep the starch that comes out with the liquid and put it back in the batter. The rest of the ingredients are mixed well with the shredded potatoes and subsequently fried in oil and drained on paper towel. Best when served hot with sour cream.
I love potatoes and pumpkin so I thought these  would go good together. See if you like this combo.
Here it was hard to approximate how much I was putting in, since pumpkins come in different sizes so after shredding the potato and pumpkin I weighed both. By volume shredded vegetables seemed to be the same. Here how they measured out to be.
2 large potatoes (approx 2 lbs)
1/2 of med pumpkin (approx 1.2lbs)
3 eggs
1/4 c flour
salt and pepper
After shredding with small blade both pumpkin and potato are drained and mixed well with the rest of the ingredients. The latkas are fried at slightly lower temperature of oil, to allow the pumpkin to cook through. Additional salt and pepper may be needed to taste. After I was done with half the batter, I decided to add something to it. I mixed in
1tsp of sumac and
3/4 tsp of paprika.
That added little more flavor to these and this version came out delicious, too. My kids and husband loved it and enjoyed for lunch with sour cream.

Wednesday, December 21, 2011

Latkes, Draniki, Deruny, Kartoffelpuffer, Bramborák etc.

It is Hanukkah time again and that means fried food. The holiday that celebrates the miracle of oil lasting for eight days even though there was only enough for one. So, oil is celebrated and it is the key element in the kitchen this time of the year, and the preferred food for frying is latkes. Latkas are not uniquely Jewish, in fact they seem to have been adopted. According to Wikipedia
Potato pancakes are commonly associated with traditional cuisines of Luxembourg (gromperekichelcher), Latvia, Lithuania, Austria, Belarus (as draniki), Germany (f. ex. as Kartoffelpuffer), Poland (as placki ziemniaczane), Ukraine (as deruny), Ashkenazi Jewry (as latkes or latkas (Yiddish: לאַטקעס, Hebrew: לביבה levivah, plural לביבות levivot)), Hungary, Slovakia, Persia and the Czech lands (as bramborák or cmunda), although other cuisines (including those of India and Korea) have similar dishes, such as Gamjajeon. It is also the national dish of Belarus. In Ukrainian, Belarusian and Russian cuisines, potato pancakes are commonly known as deruny (Ukrainian: деруни) or draniki (Russian: драники, Belarusian: дранікі). Throughout Germany, potato pancakes are also very common under the names Reibekuchen or Kartoffelpuffer, and they are eaten either salty (as a side dish) or sweet with apple sauce, sugar and cinnamon; they are a very common menu item during outdoor markets and festivals in colder seasons; a traditional favorite in southern Indiana during holiday festivities.
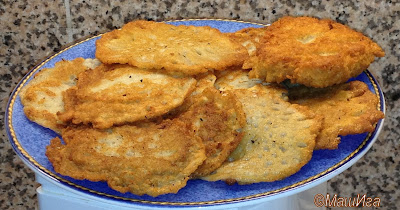
Note that more traditional latka is much thicker.
I think that this dish is more like hash browns then pancakes. The exception is my mom's recipe.
Most recipes I come across have all the liquid squeezed out of them, with adds to the crisp and crunch of  the final latkas. My mom's recipe is different. It still has the crunch but the texture and thickness is different. These come out very thin and soft in the middle with lacy and crispy edges and take very little flour. As a kid I remember, it was a long process of grating the potatoes by hand on fine grate and inevitably your hands would be scraped. The Russian name of latkas is draniki, roughly describes what happens to your hands in the process of preparing it. My grandma said if your hands are not scraped you did not make latkas, because it was not possible to came away undamaged.  It would also take some time to go through all of the potatoes, so by the last potato is done, the grated potatoes would have oxidized and turned purplish gray. I thought that was the right color.
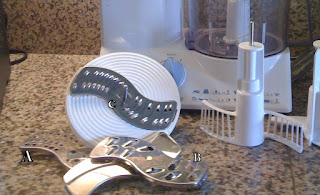
These days my food processor gets the job done in no time. Before Hanukkah I get those huge baking potatoes at Costco and with that supply I get though latkes week just fine. For this recipe I use fine blade. Labeled A. 
1 very large potato
1 egg
1 tbsp of flour
1/2 tsp salt and pepper
Mix all ingredients after the potato is grated and cook in hot oil. You may need more salt and pepper after they are done. Once the edges turn golden brown I flip them and in about another minute they are ready. I place cooked pancakes on the paper towel, to drain excess oil.  
Latkas #1
Other more traditional latkas are done in much similar manner except that the potato is drained after being grated on blade A
3 large potatoes
3 eggs
4 tbsp flour
1 tsp salt and pepper.
Additional salt may be needed after cooking. I use large metal mesh colander to drain potatoes before mixing in eggs and flour in the batter. When they are fried they are thick and sometimes I try to level out the latkes on the frying pan so they are not so thick and high.  Drain cooked draniki on the paper towel. They are best  hot of the pan with a dollop of sour cream. Yes, it has become tradition in US to eat them with apple sauce, but growing up I never heard of such thing. It is blasphemy to me, this dish is best with sour cream!
Latkas #2
Another traditional latkas are done with exactly same recipe but shredded on a different blade and the potato again is drained after being grated on Blade C. That gives these latkes different texture and bigger crisp. This is much closer to hash browns then to pancake.
3 large potatoes
3 eggs
4 tbsp flour
1 tsp salt and pepper.
The process of cooking is much the same as in the previous recipe.

Latkas #3
Yet another classic recipe calls for addition of an onion to the mix. But the rest of the recipe is almost the same.
3 large potatoes
1 large onion
3 eggs
4 tbsp flour
1 tsp salt and pepper.
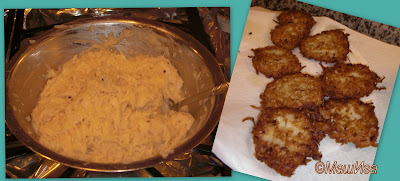
I first use the Blade B or C to shred the potato, then transfer it to drain. While that is draining, I switch the blade to regular double edge blade and blend together the onion and the rest of the ingredients. Once the batter is ready I transfer it to the bowl and add the drained potatoes then mix well. The rest of the cooking process is the same as in other recipes.
Eating same thing for a week will get boring even if you love potatoes and anything fried. So, to keep things interesting I think up different ways a recipes that I will add in the next post.

Thursday, October 20, 2011

Chicken Spice Rub

There is a spice mix that I have came up with and have been using all this summer on chicken. I have done chicken on the grill and also baked it in the oven, as well as broiled it. Chicken comes out tender and flavorful. The mix is really easy to make. I use an old large spice container to mix and keep the leftover rub in. Once I run out I refill it by adding the ingredients to it. Sometimes I use table spoons to measure and if I do not need to  much I use teaspoons. Therefore I'm using equal parts as measurement.
2 parts each of:
Paprika
Sumac
 No-Salt Seasoning like Mrs Dash
1 parts each:
Celery salt
Curry powder
Ground mustard
Onion powder
Garlic powder
Turmeric
Cumin
Chili
Salt
1/2 part Allspice
optional dash of Smoke powder
I made chicken breast bone in, on the grill with this spice rub and it came out really tender and not at all dry, as sometimes happens with chicken breast.  I suspect that turmeric powder has tenderizing properties, or perhaps the curry powder does. In any case I do not  have the same effect when I use other spices on chicken. At our friends house this summer I made similar rub, he may have been short on some of the ingredients and I did not use all that are on the list. I covered chicken leg quarters in the spices and due to grill malfunction the chicken spent about 1 hour and 45 min on low heat under cover. The result was supper juicy and tender chicken parts that was falling of the bone and soon vanished of the plate. On another occasion I made 10 lbs of leg quarters and my co-workers enjoyed it at the weekly Sunday potluck. The top picture shows this recipe used for baked chicken.
When broiling I put the tray in the middle of the oven and not too close to the heating element. I believe that high heat seals in the juices as it cooks the meat through. This is sliced up chicken breast, that is still juicy after almost 30 min in the oven.
I have not tried this rub on beef, but I did on turkey. It definitively added a lot of flavor to turkey. I do not cook pork so if you try it on it let me know how it was.

Tuesday, October 18, 2011

Lecho or Lecsó

When I was growing up in Soviet Union we did not have a large variety of fresh fruits and vegetables through out the winter months. We did have carrots, potatoes, onion and occasional beet or cabbage. If we were to eat fruits and veggies in the winter it would have to be canned. A lot of people, my grand parents including, would  spend their summer time between the little plot of land that they were lucky to have and kitchen, canning the fruits (and vegetables) of their labor. I do not know where they got the strength and how they lived on 5 hrs of sleep in the summer, but if it was not done it was not there when you need it in the winter. A lot of people survived like that during Soviet era, - that's communism - or socialism for you.
My grandparents canned everything that they grew. We had apple compote; we were eating sour cherry dumpling in the middle of the winter, as well as many jams and vegetable spreads were consumed in the winter, thanks to the tireless work of my grandparents. Occasionally, you could buy vegetables in cans in the stores, but not large variety. For some reason, this one is particularly stuck in my mind. Not sure why, since it was never made by my grandma. Perhaps, it just stands out in my memory because it was not made by her as almost everything else was. In any case, this was labeled as either Hungarian, or Bulgarian dish and was common  in the diet of Soviet people. I do not know the recipe of the dish in the jar, but after some experimentation, I think I came up to something very close to it, except may be more delicious then I remember.
This recipe is really simple, not authentic and vegetarian in my version.
Here Lecho is soaking into a slice of sourdough
2 onions cut up in large dice
3-4 carrots sliced or cut
5-6 red, yellow or orange peppers cut in pieces
can of plain tomato sauce
2-3 table spoons of paprika
1/2 tbsp of salt 
1-2 tblsp oil
The rest is easy. In a large sauteing pot, add oil and to it all of the vegetables. Paprika, and salt sprinkled over and tomato sauce is added to it. Stir often and start with large flame under the pot, then when everything is uniformly mixed and seem to get along, bring the flame lower and cook for another  20-30 min. All of the veggies will be tender and soft. I suppose canned or fresh peeled tomatoes will go well instead of tomato sauce, I have even added catchup before, when it looked like all of the fluids evaporated and it looked too dry. This makes a nice side dish or goes well over rice and polenta.

Monday, October 10, 2011

Fried Green Tomatoes

The most predictable weather in the States is in the Bay Area, California, in my opinion. The temperature is fairly stable and not much of a pattern. Hot in the summer and rainy in the winter. Lot of South Bay residents I know grow their own tomatoes. Our backyards are shaded by the number of fruit trees. I have figs and persimmons, nectarine and guava, and get to try our neighbor's plums, apples, apricot and lots of other fruits. Ah, the joys of California's weather. This year however, I got cough by surprise by the sudden coming of fall weather. Well, I knew that autumn was approaching, it just came to suddenly, and it feels like it got colder in a day, not gradually. I think my tomatoes got cough off guard, too. I doubt that any green tomatoes will get to ripen on he vine. Well, that should not be an obstacle to good food. I always thing of the movie when I cook this dish. There are a lot of versions of this simple yet delicious recipe on the net.

5 large green tomatoes thickly sliced
3 eggs
1/2 c milk
1 c flour
1 c bread crumbs or panko or corn flake crumbs, or a mix of any of those 
salt & black pepper
vegetable oil for frying
Optional favorite spices, like Italian seasoning ad Mrs Dash,  could be added to the flour. Sliced tomatoes are dredged in flour, then dipped in mixture of eggs and milk, then coated in bread crumbs and fried in oil. About 5 at a time are submerged half way in oil. Once one side is browned, the tomato slices are flipped over. That takes about 3 to 4 minutes on each side. Place on the plate that is paper towel lined. I like to keep those worm in my toaster oven, they are better crunchy, so do not heat in the microwave.

Friday, October 7, 2011

Eggplant Caponata and more

This is one of those recipes I came across while reading an old cook book on Italian cuisine. I got instantly curious and had to try it. It turned out fantastic and really delicious. I have used it many times, however I decided to expand on the recipe and do more with it, or just not limit myself to eggplant. I used more vegetables than original recipe. I added peppers zucchinis and more tomatoes in addition to increasing the capers and pine nuts. Here is what happened.


I modified to this
2 large diced eggplant in 2 cm
2 chopped onions
2 large peppers
2 large zucchinis
2 diced celery stalk
4 skinless diced tomatoes
1/4 cup of capers
1/4 cup of pine nuts
3 tablespoons sugar dissolved in
1/3 cup wine vinegar
I follow original recipe for the most part. I cook everything together. Even though it calls to remove the eggplant, I don't. I saute the veggies together . Instead of canned tomatoes, here I used fresh but peeled, since we have such an abundance of them this summer but canned is fine, too.
Make scrumptious appetizer or side dish. 
 That is what it looks like

Thursday, October 6, 2011

Teiglach for Rosh Hashana

When I was a kid, my grandma cooked a lot of foods, that are here referred to as cuisine of Ashkenazi Jews. I did not know that when I was growing up, it was just something my grandma cooked. She was an excellent chef, and her tiny kitchen produced many fantastic dishes that now live only in my memories. That is the thing with people... we do not thing that something that is there all the time, one day may be gone.  My aunt says that she has some of grandma's recipes, but I know that its likely, she does not have the ones grandma made for Jewish holidays. Plus, grandma cooked by feel, look, and touch more then a recipe. It is very sad that I do not have her recipes to carry on, still I try my best to keep traditions alive for my kids.

Every Jewish New Year we celebrate with honey. Apples are dipped in the honey to have a sweet year ahead. Every year I make a honey cake, or lekach where I use honey instead or sugar. This year I decided to do something different when I remembered something grandma made once in a while. I remember that grandma prepared a home made noodles as well as little pieces of cooked dough that we put in the soup - mandlen, here called soup nuts. The cooked pieces of dough are similar to nuts in size and texture, so I can theorize that when it was eaten in the impoverished regions within pale of settlement , it was thought of as nuts.
The sweet treat I would like to share is nothing more then cooked dough with nuts caramelized in honey. 
Naturally, since I do not have grandma's recipe to follow, I read all the recipes that I could find and made my own version of this signature dish. I tried to remember the taste of my grandma's recipe and that is what guided me in the ingredients I did or did not use.

dough:
4 eggs
1/4 c salad oil
2 cups of flour
1/8 tsp of salt
oil for frying
candy:
1 lb of honey
1/2 c hazelnuts coarsely chopped
1/2 c walnut pieces
1/2 c  almond sliced or chopped
1/2 pine nuts
lemon peel from 1 lemon


In a food processor blend eggs and oil with salt, then add flour. Once the dough comes together turn it out to well flowered board. Roll the dough into less then 1/2 inch thickens and cut into strips then into bean size pieces. Make sure they do not stick together but shake off any excess flour when cooking. I tried both methods of cooking the dough. about 1/3 of the batch I cooked for about 7-8 min in the 450F oven and the rest fried. Fried pieces of dough is much better looking and much better tasting. I realized that frying is not as healthy as baking the dough, but let's face it, this is a dessert that is made once a year. As with all the desserts it is not meant to be a main dish, but rather shared and savoured in small amounts with family and friends.  The next step is cooking the honey. In a large pan honey is brought to a boil and then simmer, thickening it and reducing it in volume for about 8-10 min. I love nuts and I do not like them toasted. Most recipes out there call for the nuts to be toasted, but I did not. I do not think toasting here, add anything in flavor, so I skipped toasting nuts. Once the honey is ready all of the dough and nuts is added to the honey and stirred carefully, the mixture is very hot. Stir and mix in the lemon peel making sure everything is coated evenly. Cook for additional 5-10 minutes, depending on the thickness of the mixture.
Once it resembles more of a ball then a stew, the dish is done. Cooked mixture then transferredd onto the large dish that can be sprinkled with a layer of sliced almonds before turning out the candy. The loose honey will still settle down to the bottom, and make it difficult for the candy to pick off from the plate so do not fret. As the mixture cools it becomes easier to handle and can be formed into individual small portions. I left the plate as it looks in the picture and cut off servings as needed. This was a fun dish to make and eat.

Wednesday, October 5, 2011

Fire Roasted Pepers


This is one of my staple recipes I cook all the time. Luckily I live next to an Oriental supermarket and bell peppers  there usually very inexpensive. I pick up a dozen and roast them over the the open flame right on the stove. Garlic and olive oil with addition salt make perfect dressing. The peppers keep great in the fridge for about one week. It is not recommended however to keep garlic in oil for longer then 10 days, to prevent botulism. In any case, the peppers usually do not survive that long. They make an excellent appetiser, side dish or become an excellent addition to a sandwich.


I have put the peppers in sandwiches out of lavash bead for one of the birthday parties for my kids. I like lavash roller sandwiches since they are easy to make  and make great finger food at the party.
I made several different varieties.
One was with turkey, another with pastrami and last one with roasted vegetables


Lavash is usually much lower in calories then a regular bun, not to mention that one piece of lavash once rolled up gets cut into much smaller pieces. Having given the link above, I want to note that Trader Joe's lavash is smaller then the kind I buy at my Middle Eastern store. Some things I want to note is that lavash is really thin and must be fresh out of sealed bag for the rolled up sandwich to be a success. Once the bag is open the bread dries out really easy and starts to crumble when you try to use it. Lay your lavash out and place the driest ingredients out, covering about half to 1/3 of the bread. Once you start to roll you will want and additional layer of bread to hold the sandwich together. If you are using a mayo or your favorite spread it should go on the top of meat and not on the bread itself.  The bread gets torn easily so ingredients should not really be very moist. In the past I have sprinkled some milled flax seed directly on the lavash to act as an absorbent . Vegetarian rollers go great with hummus, but once again, lavash does not like to much moisture and once soggy, it falls apart. I hope I do not completely discourage anyone, as this is great idea for the party.

Friday, July 29, 2011

Grilled Vegetables

Since I do a lot of grilling in the summer and eat a lot of red meat, I do not forget about cooking veggies on the grill. I have an easy recipe that I came up with and have being using to several years now. It always comes our great. I start out with fresh herbs. I have lots of oregano in my garden and in the summer, I always have fresh parsley in my fridge and I usually buy grown plant of basil at Trader Joe's. These are the main ingredient for a vegetable marinade. Garlic and extra virgin olive oil  other ingredients together with salt and pepper for seasoning.

Many vegetables can be used here. This particular time I had zucchinis, onions and celery, but in the past I also used green beans, asparagus, carrots and green onions. In a small handheld blender 
4-5 garlic cloves,
12-15 sprigs of parsley (stems and all),
5-6 basil leafs, oregano leaves from 3-4 stems,
3/4-1 c of oil, 1
 tsp of salt and
1/2 tsp pepper.
 Parsley leafs ground up well in the blender but basil if too tough and oregano is to woody.
Everything gets pureed into soup like mix and added to a large plastic Ziploc bag with the vegetables. Since there is salt in the mix, it helps to draw the water out the veggies and marinate them, almost cooking them half way. The bag is placed in the refrigerator for a few hours and can even stay there overnight.
The veggies are sliced and cut in a manner that will be easiest to handle them when cooking. Long strips, that will not fall through in between the cooking grates is best. However, that is not always possible and in that case vegetable grilling tray or a pan is your best fiend. Cooking times vary between the vegetables so use your discretion on how long your veggies stay on the grill.


The left over juice - marinade is excellent for bread garnish. Dip one side of the bread in the marinade and add to the grill and cook until golden brown and crunchy. It is like garlic bread but even better.
 Do not use the left over marinade without cooking it.!!!

Thursday, July 28, 2011

Corn Salad

Summer is the season of the corn and it is everywhere on sale. There are some great deals out here and you can get 6 ears for a buck in the summer. I love corn. It brings so many childhood memories. My grandma used to boil it for a long time and it was never as sweet as it is today. I used to add a little sugar to the water when I cooked my corn but these days it is not necessary. It's not the Soviet corn of my childhood and today's corn has been engineered and is sweet even raw. In fact, I often chose my corn by picking one kernel of the corn and tasting it to see if it is sweet. In the summer I am doing a lot of grilling. Often to optimize my time and to avoid running between the stove and the grill I try to just grill. The other  day I baked potatoes right on the upper shelf. If I am grilling something already, I put corn in it's husk on the upper shelf of the grill or over small flame. It does not exactly grill it, but rather steams it in its husk. Lately all of the corn has been super sweet. I can eat a lot of it if I do not stop myself. There are a lot of things that can be done with corn. I find myself most often making a salad rather then soup or a corn chowder, although I like those, too. This salad is really simple and can be served warm or cold.
approx 2 tbsp oil for sauteing
1 small onion or a 1/2 large preferably sweet, diced
8 oz of mushrooms chopped
1 red pepper, diced
3 ears of corn (kernels only)
3 green onions chopped
2-3 tbsp of fresh dill
1/4 c -1/3 balsamic vinegar
salt pepper to taste.
optional 1 garlic clove pressed
It is fun to get one of the ears of corn in different color. One white the rest is yellow, of the other way around but not necessary. I start by sauteing an onion and add to it mushrooms then pepper.Corn kernels is added last and it does not need too much cooking. There is a tricky part to cooking corn. There is so much sugar in it that its going to inevitably get caramelized to the bottom of the pan. You can stir and stir but it is unavoidable. The only thing you can to is not to scrape the burnt on sugar off the bottom with your spatula. It does not matter if you have a non stick pan or in constant motion stirring, it is going to happen. just do not scrape that burnt on sugar into the salad. In few minutes, when the corn is cooked, transfer it to the bowl and add the vinegar, dill and green onion.and mix the salad while it is still hot. You can substitute fresh dill for parsley, basil of other fresh herbs, it's your choice. It is a nice side dish or a cold salad the next day.

Saturday, July 23, 2011

Beef and Zucchinis Skewers

I will admit that it was not my idea, to arrange it like that but the spices and ground meat preparation is all mine. For this odd looking but delicious dish I used fresh and dry Italian seasoning. I used fresh Italian parsley, oregano, basil and a lot of it.
1 large onion
4-5 garlic cloves
half of bunch of parsley
1/2 c of oregano leaves loosely packed
1/2 c of basil leafs loosely packed
1 tbsp of dry Italian seasonings
Salt and pepper
3 lbs ground beef
4-5 zucchinis similar in size and thickness
In a food processor puree all of the seasonings together until they make uniform soup like mix. Add to the beef and blend well by hands in a large bowl. Clean and peal zucchinis so that they look striped. Slice them in about 1/2 inch slices. Skewer the zucchinis on the soaked bamboo skewers and leave gaps in between the slices. Add enough ground meet to skewers to create uniform thickness on each skewer. Wrap each skewer in plastic wrap and place in the freezer for about 1-2 hours before grilling. This does not need to be grilled, however and can also be baked. Instead of wrapping in plastic, each skewer can be wrapped in foil and baked. It does not need to be frozen then, the foil will keep the shape and juices of the skewer if they are baked in the foil wrap. If you will grill, then keep in mind that the skewer is placed parallel to the grill bars and not across it. That way, the grill marks will look like those on the picture. Grill few minuted on each side as you turn slightly each skewer. All together it should take about 25-30 min. Here there is a bit more meat then one person can handle, so I recommend to add less meat if you are planning 1 skewer per person.